Category: MAAS

  • Deploying Ubuntu Core 18 with MAAS 2.5

    Forward

    Ubuntu Core is a snap-only, lightweight version of Ubuntu. The kernel, the root file system, and the snap daemon are all packaged and operated as snaps compared to the traditional layout of a Linux distribution. Ubuntu Core is designed around IoT devices due to its lightweight, transactional updates and security. Deployment usually happens in the factory of the device and the software is “flashed” on to the storage medium. 

    MAAS, or Metal-As-A-Service, is a Canonical-based application that typically runs on a server or Top of Rack (ToR) switch that is used to manage and deploy various operating systems like Windows Ubuntu or Red Hat Linux and onto those bare metal servers. It is a way to treat bare metal servers as cloud services where you can manage it as easily as managing cloud instances.

    With Ubuntu Core 18, cloud-init, which is the provisioning and configuration piece of Ubuntu, comes built-in. MAAS makes use of cloud-init to set up network access, initialize users, copy ssh keys to the device and to set up storage and partitions. 

    This document will explain how to set up MAAS to be able to deploy Ubuntu Core to devices, which devices are compatible with MAAS so that it can be used to deploy and what customizations have to be done to the Ubuntu Core image to have seamless integration with MAAS and the target devices.

    MAAS Setup

    Installing MAAS is fairly easy. There are two methods of deployment: you can either install it from the main repo in Ubuntu Server after the server has been deployed, you can install MAAS during the initial installation of Ubuntu Server, or you can install it via snap packages on any Linux distribution capable of running snaps. This document will cover installing MAAS from the MAAS/next repository that is the beta next release of MAAS (2.5) in Ubuntu 18.04.2. More information on other installations can be found here.

    Deploy Ubuntu Server

    1. Download the latest version of Ubuntu Server 18.04.2 by clicking here.
    2. Burn the media to a USB or DVD and install Ubuntu Server by following the Installation Guide located here.
    3. Once Ubuntu Server is running, do an update to make sure you have the latest versions of the software:
      sudo apt update && sudo apt upgrade -y
    4. Once this completes, you need to add the MAAS/next ppa to your apt.repos:
      sudo apt-add-repository -yu ppa:maas/next
    5. Now, install MAAS on the server:
      sudo apt install maas -y
    6. Once MAAS finishes installing, you need to configure an admin user account. Use the following command to do this:
      sudo maas createadmin --username=admin
      Enter a password and email address for the admin user and now you are ready to login to the web UI. However, we have one small step left to do since the next following steps will require command line use.
    7. Now, we need to save the API key to login to the MAAS command line. This is how we will upload the Ubuntu Core image to MAAS so that it can be deployed on devices. Use the following command to save the key:
      sudo maas apikey --username=admin > ~/apikey
      This will save the API key to your home directory as apikey. This will be used later when we actually upload the Ubuntu Core image to the server.

    Configuring MAAS

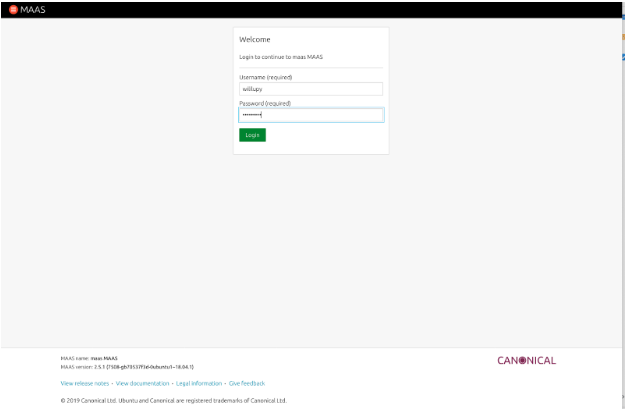
    1. Now, we need to finish setting up MAAS. Login to the web UI by opening a browser window to:
      http://maas.server.address:5240/MAAS
    2. After you login, you are presented with a screen asking for DNS forwarders. Here you can add your own internal DNS servers, or use the public ones. You can also leave it blank, but I recommend at least entering 8.8.8.8.
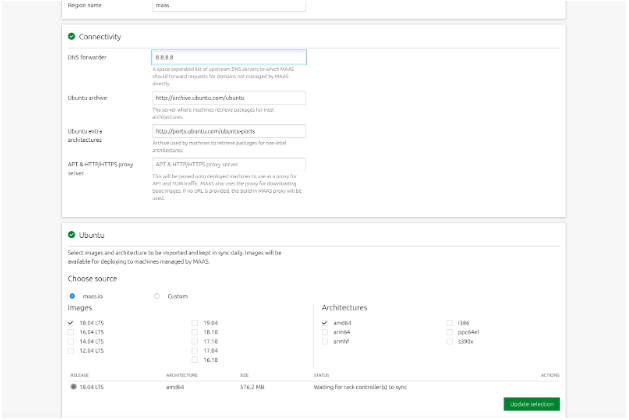
      You also need to have at least one image downloaded and installed, By default MAAS downloads the X86_64 version of Ubuntu Server 18.04. You can add others if you want, but this should suffice for now.
    3. Scroll all the way to the bottom and click Continue.
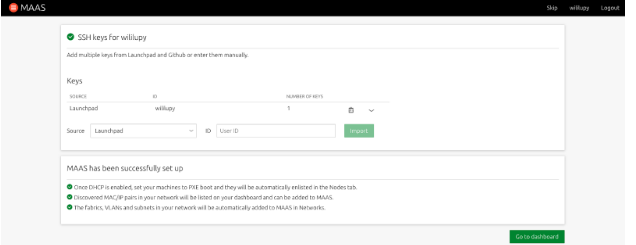
    4. On the next screen, import any other SSH keys you want MAAS to be able to provision to servers/devices and then click import and then click Go to dashboard to go to the Main MAAS UI.
    5. From the main dashboard, click the Subnets tab. We need to setup DHCP on the network that will be managing the servers and devices.
    6. Click on the VLAN for the subnet you want to manage DHCP for. Click the ‘untagged’ label.
    7. From the Action button, select Provide DHCP and configure the  address pool and the gateway for the subnet and then click Provide DHCP button.
    8. MAAS is configured now to manage and deploy images that are connected to the subnet that you just configured. You can click on the Machines tab and you are ready to start enlisting, commissioning, and deploying Nodes.

    OPTIONAL: Setup MAAS as a Router using UFW

    This step is optional. If your network that is managing the subnet has a router or a policy that routes traffic to the internet or other networks, this step can be bypassed. If you are testing on a Canonical OrangeBox this can be skipped since the mini switch in the box has routing capabilities built in. However, if you are running this in a VM environment or just testing locally on a subnet you created in your home lab, this will help get your clients you deploy with MAAS to get to the internet and work properly. I used UFW since it is built in to Ubuntu and fairly easy to configure, just a lot of rules for the various ports that MAAS uses to do its “magic.”

    Below is a list of ports that MAAS uses:

    Port
    Use
    7911/TCPMAAS
    22/TCPSSH
    53/TCP and UDPDNS
    3128/TCPiSCSI
    8000/TCPSquid
    5240/TCP and UDPMAAS
    5247/TCP and UDPMAAS
    5248/TCPMAAS
    5249/TCPMAAS
    5250/TCPMAAS
    5251/TCPMAAS
    5252/TCPMAAS
    5253/TCPMAAS
    67/UDPDHCP
    68/UDPDHCP
    69/UDPTFTP
    123/UDPNTP
    5353/UDPMulticast DNS
    5787/UDPMAAS

    Now, for the procedure to enable NAT and forwarding in MAAS using UFW.
    NOTE: It is much easier to work with the firewall as root. You can switch to root using the following command:
    sudo -s

    1. Setup the forwarding policy for UFW by modifying the /etc/ufw/default and change the following:
      DEFAULT_FORWARD_POLICY=”ACCEPT”
    2. Uncomment net/ipv4/ip_forward=1 from /etc/ufw/sysctl.conf to allow ipv4 forwarding. You can also uncomment the ipv6 if you need it.
    3. Next, modify the /etc/ufw/before.rules to create the NAT table and the source network and interface by adding the following BEFORE the filter rules:
      # NAT table rules 
      *nat 
      :POSTROUTING ACCEPT [0:0] 
      
      # Forward traffic through the external interface on host 
      -A POSTROUTING -s 172.16.236.0/24 -o ens33 -j MASQUERADE 
      
      # Don’t delete the ‘COMMIT’ line or this nat table rules 
      # won’t be applied 
      COMMIT 
    4. Now we are ready to create the firewall rules to allow connectivity to MAAS and the various services. Below are the commands to do this:
      ufw allow ssh 
      ufw allow bind9 
      ufw allow ntp 
      ufw allow tftp 
      ufw allow 67:68/udp 
      ufw allow 7911/tcp 
      ufw allow 3128/tcp 
      ufw allow 8000/tcp 
      ufw allow 5240/tcp 
      ufw allow 5240/udp 
      ufw allow 5247:5253/tcp 
      ufw allow 5247:5253/udp 
      ufw allow 5787/udp 
    5. Now we can start the firewall and test:
      ufw enable 
      ufw status
      You will get a list of the firewall rules. You can connect a device to your internal network managed by MAAS, and try to ping Google.com or 8.8.8.8 and verify that you get a return echo. If that is all working properly, then you have successfully setup MAAS to act as a router for clients on the managed network.

    Ubuntu Core Image Setup

    Ubuntu Core 18 can deploy from MAAS out of the box. However, there is currently a bug in console-conf where if MAAS manages the device and configures the network, console-conf will fail on the network setup and go into a loop where you cannot configure the device. You can still manage to ssh and login using your keys that are installed to the device via MAAS managed keys, but you cannot login locally on the console of the device because it does not know it is fully configured.

    There are also some limitations of what you can configure for the device through MAAS. For example, you cannot change the filesystem and partition layout since the image is basically just dd’d to the device, so after installation and first boot, Ubuntu Core resizes the partition to fit the device, and installs the correct partitions to be able to boot the device up properly. The only parts that Ubuntu Core uses from cloud-init is the network configuration and it creates a user named Ubuntu on the device, and then copies the stored SSH keys for the MAAS user deploying the device onto the device for remote login/administration.

    To get around the previous mentioned bug, before we install the image into MAAS, we have to add a file so that it doesn’t run console-conf after first boot. The following procedure will go into this in detail.

    Download Ubuntu Core 18 and upload it to the MAAS Server

    1. Download the latest version of Ubuntu Core 18 from here.
    2. SCP the image to the MAAS server:
      scp ubuntu-core-18-amd64.img.xz maas.server.address:~
    3. SSH to the MAAS server:
      ssh maas.server.address
    4. Login to the MAAS CLI using the APIkey you created previously:
      maas login admin http://localhost:5240/MAAS `cat ~/apikey`
    5. Upload the image to MAAS:
      maas admin boot-resources create name=ubuntu-core/uc18 \
      title="Ubuntu Core 18" filetype=ddxz \ 
      content@=ubuntu-core-18-amd64.img.xz architecture=amd64/generic 
    6. Verify that the image uploaded by going to the Images tab in MAAS UI and at the bottom you will see Custom Images, and the image will be there:
    7. You are now ready to deploy Ubuntu Core to a device managed by MAAS.

    Implementation

    So now we are ready to deploy Ubuntu Core 18 on to a device. First, make sure that your device is connected to the network, there is no OS installed on the device, and that it is setup to PXE boot. Make sure that you connect the power to a managed UPS outlet, or if it has a remote poweron/off ability, that you have the credentials or settings and that they are compatible with MAAS. For this demo, I used an Intel NUC, which uses Intel AMT for the power management. I configured it on the NUC in the BIOS and then entered in those settings when I got to that step. 

    MAAS has three phases when it acquires new devices. First, the device needs to be powered up and MAAS will automatically detect a new device on the network when it asks for a DHCP address. MAAS will boot up an ephemeral image and probe the device for network connectivity, and power management, and if it can, power off the device, and then add it to the MAAS database. This is called “Enlistment.”

    Once this step is completed, from the MAAS UI, the operator can then “Commission” the device. This boots up an ephemeral image on the device and probes all the hardware, gets more detailed information, and can perform tests on the device and also upgrade firmware if required. Once this step is completed, the device is ready to be Provisioned, or deployed.

    To provision a device, once it is in the Ready state, you can select it from the Machine tab in MAAS, and from the Action button, you select Deploy.

    Below will be the steps to enlist, commission and deploy Ubuntu Core 18.

    Enlistment

    1. Connect the device to the network being managed by MAAS. Make sure it is fully configured to use remote power up and down.
    2. Power on the device. You can either connect to the console of the device or install headless and watch MAAS. Once the device is enlisted, it will show up in the Machine tab.
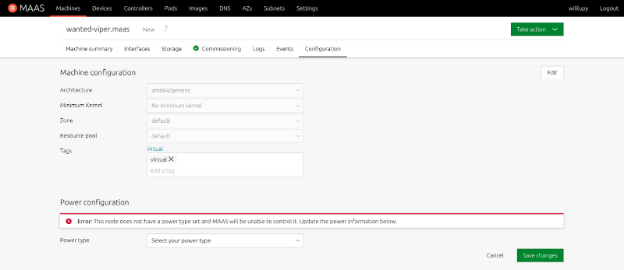
      1. Doing this sometimes will cause the system to not know the power type to use. You may have to configure the power for the device for remote power on. For Intel NUC’s, they use AMT, but some make use of IPMI. You can also select Managed PDU’s as well. If it is a VM, you can use KVM or VMware. VirtualBox is not supported.
    3. When enlistment is finished, you will get the following in the Machine tab in MAAS:
    4. If enlistment couldn’t detect the power type, you will have to manually update it. Select the node.
    5. Click on Configuration
    6. From the Power type pull-down, select the power type that the device uses and enter all the applicable information. If it is entered correctly, you will get the following indication on the machine:

    Commissioning

    When the device is in a “New” status, it needs to be commissioned before it can be deployed. From the Machine tab screen, perform the following:

    1. Select the device from the Machine tab.
    2. From the Take action button, select Commission.
    3. You can watch the hardware test and the commission scripts run from the respective tabs in the Machine view in the MAAS UI:
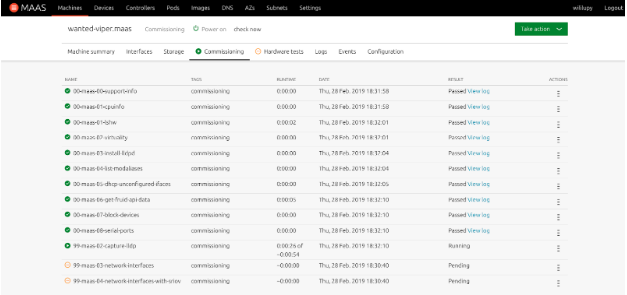
    4. Once all the hardware tests and commission scripts have passed, the machine will be powered off and put in the Ready state.

    Deployment

    The device is now ready to have Ubuntu Core 18 installed. Follow this procedure for deploying Ubuntu Core.

    1. From the Machine tab in the Web UI, select the device you want to deploy Ubuntu Core to.
    2. From the Machine view of the device, you will see various tabs. These tabs let you customize the installation of the device.
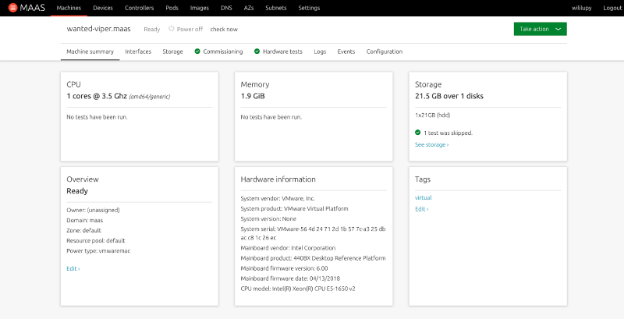
    3. Click on the Interfaces tab. This tab lets you configure the network address of the device. To customize it, click the Action icon highlighted in the following picture and select Edit physical.
    4. The Storage tab does not function with Ubuntu Core, so any selection you make will not apply to Ubuntu Core. This is due to how Ubuntu Core is installed on the device. Since it is just dd’d on to the device, it will auto partition on first boot so that Ubuntu Core will work as designed with the writable partition and the boot/EFI partitions.
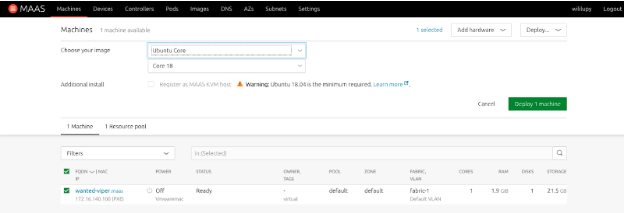
    5. From the green Take action button, select Deploy
    6. From the Choose your image pull down, select Ubuntu Core.
    7. Make sure that Core 18 is the image that it will install.
    8. Select Deploy Machine
    9. Once deployment is finished, the device will remain powered on and have Core 18 in the status. You can now SSH to the device with the user ubuntu.

    NOTE: Even though the device is saying that it is deployed, if you look at the console of the device, it will be at the first boot state. This is a bug in Console-conf where even though the device is configured, console-conf is not aware of this. If you try to configure the device, it will fail at the network setup with the following error:
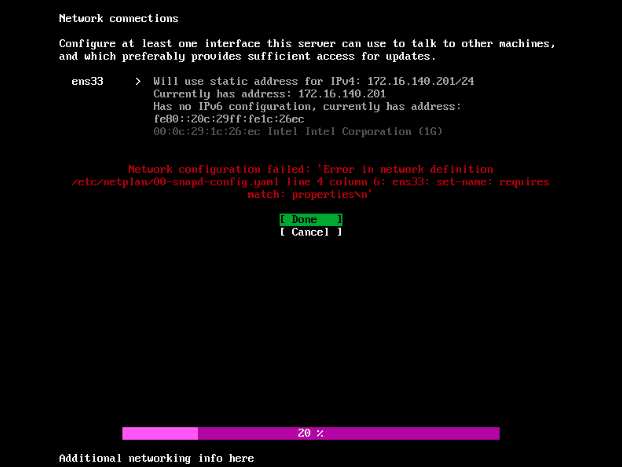
    If you select Done, you get back on this screen. If you select Cancel, you end up on the main configuration screen and you can’t move past this. To work around this, we need to let console-conf know that the device is already configured.

    1. SSH to the device.
      ssh ubuntu@device.name
    2. A file needs to be placed in /var/lib/console-conf called complete.
      sudo touch /var/lib/console-conf/complete
    3. Reboot the device and when it comes back online, you will be presented the normal login screen on the console. However you cannot login via the console due to security of Ubuntu Core 18.

    Conclusion

    With this document, you can now deploy Ubuntu Core 18 to devices that are managed by MAAS. I hope that this has been helpful and informative. 
  • Deploying Whitebox Switch ONIE images with MAAS

    Hello,

    So I spend a lot of time deploying switches in my lab for my job. I also really like Canonical’s tools for managing infrastructure and bare metal servers called MAAS, or Metal-As-A-Service. It can deploy servers better than really any other solution I have used in the past, including Red Hat’s Satellite, Microsoft’s Windows Deployment Services (WDS) and Solaris’s Jumpstart server. The  thing I particularly like is that it is OS agnostic. Meaning even though it is a Canonical product, it is not restricted to just Ubuntu. I can setup MAAS to deploy any, Operating system to my bare metal, as long as I have an image for it. So I can deploy Red Hat and Windows as well.

    So I was thinking, how hard would it be to make MAAS deploy ONIE images on Bare Metal Whitebox switches? The answer is, really easy. Since MAAS is using a Web backend based on Apache2, it has the default directory structure for Apache2. So in /var/www/html I can put my ONIE images for my switches in that location. Also, becuase MAAS is the DNS and DHCP server for my managed devices and servers, it is a no brainer on using this to deploy whitebox switches.

    Typically, when deploying ONIE images on to a Whitebox switch, Network Administrators have a couple options. They can either use a USB thumb drive with the ONIE image burnt on it and restore it via the ONIE Rescue option in the ONIE GRUB Boot menu and then typing install_url file:///path/to/onie-installerand then it install, but that is only efficient if you are deploying maybe 1-5 switches. As a Network Engineer, if I have to leave my seat to reset and update my switches, that is unsat. And if I’m carrying my “serial leash” over my shoulder, that is a walk of shame…

    The other option is to use the Network Boot option, which is the default way of deploying a NOS onto a Whitebox switch. This is the automatic option, but it does depend on a couple of things:

    1. The ONIE image is named specifically for the device, of example, a Celestica Redstone XP switch has the default ONIE installer image name of onie-installer-x86_64-cel_rxp_sxp-r0 and if it can’t find that specific image, it starts decrementing down to onie-installer-x86_64-cel_rxp_sxp to onie-installer-x86_64 until it can find an image. Then it checksums that image to make sure that it will work on the device based on the machine.conf.
    2. That the DHCP server is also the web server that is hosting the image. Now this is subjective, because you can have the default-url set in your DHCP server to point to the location of the ONIE images.

    As you can see, there a pros and cons to both deployments. Now to get why I like MAAS to do this.

    1. MAAS is a DHCP, DNS, and Web server all in one pretty package. I can plug my whitebox switch’s management port into the network that is managed by MAAS and set it up as a Device in MAAS so that I know what the IP address will be.
    2. I can put the ONIE image directly on MAAS in the /var/www/html directory and ONIE will automagically pick it up and install

    One thing to note, is that I cannot directly manage the switch from MAAS. Meaning that I cannot use MAAS to configure the NIC ports, and I cannot use MAAS to setup local users on the device or use MAAS to deploy an OS from the list of installed images on my MAAS server. Now there are plans that this functionality will come in the future, but it will not be based on ONIE images, and instead be PXE installed and managed by MAAS and specific images that are switch supported. This is outside of the scope of this blog entry, but as soon as they do become available, you can bet I will write a blog entry on how to do that.

    So, to get MAAS to deploy your whitebox switches, these are the steps:

    1. Copy your ONIE installer images to /var/www/html on the MAAS server.
    2. Under the Node tab, there is a Devices option at the top of the Web page, click that and enter the MAC address of the switch, as well as the name you want to give the device and the IP address if you don’t want to have a dynamic address assigned to the switch. I highly recommend that you set a static so that you don’t have to guess what the address is of your switch to manage it in the future.
    3. Power on (ie, plug in) the switch
    4. On the serial console of the switch, watch as the device comes online and starts ONIE, it will by default go into ONIE Install OS and start the install process
    5. When complete, the switch will reboot and the NOS will start up
    6. SSH into the switch via the static IP address that MAAS assigned to it
    7. You’re done.

    So now you can use MAAS to not only manage your servers, but it can deploy your NOS on to your Whitebox switches. You can also use this procedure for upgrading the NOS using ONIE on your Whitebox switches.

    DISCLAIMER: This is not supported by Canonical. If you try this and it doesn’t work, you cannot contact Canonical for support. They do not support ONIE or  the NOS’s that are deployed on the switches that are not running Ubuntu. This article is just showing that you can use MAAS to do this if you so wish to be able to have this and not have to have a separate server to deploy ONIE images from and have a one stop shop for your infrastructure deployments. While this should not impact MAAS functionality or deploying other services through MAAS, you are making changes to the directory structure that is not supported by Canonical.

    I wrote this article because I have had many Network Engineers and Admins ask if they could use MAAS to deploy ONIE images, which yes, you can, but Canonical will not support it since it is not a Canonical supported deployment method.

    If you have any questions, or just want to say “Great article” leave a comment!

    Thanks!

  • Deploying SwitchDev with MAAS

    Hello! So in this post, I’m going to show how to deploy a Mellanox switch with the latest firmware installed using Canonical’s Metal-As-A-Service, or MAAS. It’s actually pretty easy since with the latest release, 16.10, it has SwitchDev already enabled. There are just a few little things you need to do to make this deployment a much easier thing.

    The point of this article is so that you can install your Mellanox switch, connect it to your MAAS managed network, and deploy the switch and it will be ready to go.

    First thing you need to do is on the MAAS server, add a tag. This tag will make use of the “kernel_opts” meta tag so that we can use the console on the device. By default, MAAS wants to use tty and ttyS0, which is fine most of the time, but because Mellanox uses Console redirection, we have to include the baud rate and other settings otherwise we get no displayed output. This is easy enough. Log in to your MAAS server, and login to the MAAS CLI.

    NOTE: I like to export my API Key in my home directory so I don’t have to type it. I’ve seen some people make it an env variable so that they can just call it with a $APIKEY variable, either way, you can do this with the following command to make it easier to login:

    sudo maas apikey --username $USER > maas.apikey

    Now, you can login to the MAAS CLI:

    maas login default http://maas/MAAS `cat ~/maas.apikey`

    Now you can create the tag for the switch’s console:

    maas default tags create name='serial_console' comment='115200 serial console' kernel_opts='console=ttyS0,115200n8'

    You can add as many other tags and kernel_opts as necessary for each different switch you want to have managed by MAAS.

    Next, we have to download Ubuntu Yakkety Yak into MAAS if you don’t already have it. To do this, go to the Images tab in the MAAS WebUI, check the 16.10 checkbox and click Save Selection. After a few moments MAAS will download the image and you’ll be able to use it to deploy systems with. After you save selection, you can move on to the next step since by the time you’re done with it, MAAS will have downloaded the image and you’ll be ready to deploy.

    Now, you are ready to have the switch be provisioned by MAAS. Plug in the switch to a managed power supply that MAAS can manage. I use DLI’s PDU in my home lab with great success. Just make sure it is configured properly so that MAAS can use it. If you have any questions about this, leave it in the comments and I’ll reply back.

    Login to the PDU’s web interface and turn on the switch. Make sure you have the console cable connected to either a laptop or a serial concentrator that you can access to watch the device come up. You have to get into the BIOS to change the boot order. By default the Mellanox switch boots to the installed hard drive since it comes with ONIE pre-loaded on it. This will cause the system to never boot via PXE, which is what MAAS needs for it to work. When you get the AMI BIOS screen press CTRL-B, there is no prompt, you just press it and it will take you into the BIOS. Under the Boot tab, move the P0:InnoDisk to the third option and make sure that the Intel GB NIC’s are first and second. Then Save and Exit the BIOS and it will reboot the switch. You will get two PXE BIOS boot messages, one for each NIC, then the BIOS display again, then you get the familiar PXE Boot process. The device will hit MAAS and start the Provisioning. You will get no display on your console, but when it is finished, you will hear the fans over speed and get a red Fault indication on the device. Since MAAS tries to power down the device with the shutdown command, and there is no power off with a switch, it goes into a faulted state. From the PDU interface, shutdown the switch. Go to MAAS and you will see your device there in a NEW status. You need to adjust the power for it, so click on it in the MAAS WebUI and scroll down to Power. Put in the Power information for the device.

    NOTE: If you are using the DLI PDU, you will get no power indication. This is by design. For power status, you will have to look at the PDU web interface or look at the switch and verify it is on.

    Once you have the power setup for the switch, Click on Edit for the tags selection and put in serial_console (It should auto-populate as you type it) and click save. Now you are ready to commission the switch. From the Task pull down, select Commission. The switch will power up and start to boot up. NOTE: You may want to watch this since sometimes I have seen it change the boot order back to hard drive after the faulted state. If it does, just go back into the BIOS and change the boot order back to PXE. After you commission the device, this seems to not happen anymore.

    After commissioning, You will have a Ready state in MAAS. You are now ready to deploy the switch. Click on the switch, and select Deploy from the Task pulldown. You will be given the option of what Operating System and version to install on the device. Select Yakkety Yak and click Deploy. You can watch the device come up, install and deploy. After the reboot, you will have a deployed switch. You can login to the device via SSH with the ubuntu@device-name. I highly recommend adding a local user account with password on the device so that you have a way to get into the device locally if your management network ever goes down and you need to configure the device.

    The last thing you have to do is add udev rules so that the front panel gets the correct names for the device. This is just like with the switchdev in Ubuntu-Core on the switch. First you need the get the switchid. To do that run the following command:

    ip link show dev eth0 | awk '{print $9}'

    The output is the switch id. Note that since you will need it for the udev rule. Now we need to create it. To do that, login to the switch and run:

    sudo vi /etc/udev/rules.d/10_custom.rules

    and enter the following

    SUBSYSTEM=="net", ACTION=="add", ATTR{phys_switch_id}=="<switch-id>", ATTR{phys_port_name}!="", NAME="sw1$attr{phys_port_name}"

    <switch-id> is the value you got from the previous command/step.

    Reboot the switch and verify that the interfaces are named properly:

    ip link show dev sw1p1

    You should get the following:

    34: sw1p1: <BROADCAST,MULTICAST> mtu 1500 qdisc noop switchid 7cfe90f02dc0 state DOWN mode DEFAULT group default qlen 1000
    link/ether 7c:fe:90:f0:2d:fd brd ff:ff:ff:ff:ff:ff

    At this point you are ready to setup your device as you see fit using standard Linux commands.

    Please let me know if the comments if you have any questions.

    Thanks!


  • MAAS 2.0 and DNS

    Hello everyone! Been a while since I wrote a blog entry. I updated my network topology last night to accommodate for guest access and to separate my personal network from my work network to keep my video game consoles and my cell phones off of my external facing network and firewall them up better for more security. I decided during this time as well to revisit my DNS and Virtual Host machines.

    I was running ESXi 6 on one of my hosts that ran Ubuntu VM’s for this site, and my email server, and a couple other servers that I use to do my job. It became a hassle to keep it up and running on older hardware so I upgraded it to KVM and Ubuntu 16.04 and I decided that I would also upgrade my VM’s from 14.04 LTS to 16.04 LTS since I had the downtime.

    Anyways, I decided that I was going to use MAAS, or Canonical’s Metal-As-A-Service to provision my KVM’s and also get rid of my aging DHCP/DNS server that was running 12.04 and just move everything to MAAS. Sounds easy enough? Not so much.

    Building the KVM host was easy. I installed Ubuntu 16.04, selected OpenSSH server and Virtual Machine Host from the TaskSel and then after it was installed, ran sudo apt update && sudo apt upgrade, rebooted, and then ran sudo apt install ovmf qemu and modified my /etc/libvirt/qemu.conf to point to where ovmf was (basically just removed the comments from the file for those settings) and than ran systemctl restart libvirt-bin and was ready to go. I also modified my NIC interfaces to bridges.

    Now I was ready to build my MAAS server. I build a KVM with 2GB of RAM and 2 processors and 60GB of storage and added 2 NIC’s, one for each of my networks, one for my servers and external network, and one for my internal guest network. I installed a clean 16.04 LTS server, added OpenSSH and configured the interfaces for static addresses and ran update/upgrade and now was ready to install MAAS. I ran sudo apt install maas and was off and running. After it was complete, I ran sudo maas createadmin to create the admin account. I then logged in to maas by opening Firefox and browsing to my maas servers IP address and logging in. I click on my account in the upper right corner and went to Account, and copied my API key to a file called maas.key in my home directory on MAAS so that when I need to use the CLI, I can just cat maas.key instead of having to type the whole damn thing in. I then copied all my SSH keys to my account so that I can access my new nodes with my SSH key, and I then went to the Images tab to make sure it was downloading the 16.04 image, and did some minor settings to make sure it seen all my networks and put in my DNS forwarders.

    Next, it was time to setup DHCP. I clicked on the Network tab and clicked on the subnet I wanted to have DHCP. I set a dynamic reservation for my internal network starting at .50 and going to .200. I then clicked my other subnet and did the same thing there. I then went back to the Network tab and clicked the VLAN for each of my fabrics. Under the Take Action button, I configured DHCP for this network and was ready to go.

    I built my webserver as a KVM, and told it to PXE boot and attach it to the server network bridge on my KVM host. I powered it up and boom! MAAS found it, and enlisted the node. I changed its name, but realized it was not using my DNS name, but instead the MAAS default of “maas.” According to Canonical’s documentation on MAAS, you can change this from the WebUI. That would be helpful to tell a user how, but I’m not going to go there. In 1.9, it was as easy as clicking the domain name on the Nodes tab, but in 2.0, not so much. I ended up changing it from the MAAS CLI by ssh’ing into my MAAS server and running the following command to login:

    maas login maas http://maas/MAAS `cat ~/maas.key`

    I then ran maas maas domain update name=lucaswilliams.net and verified that it was updated with maas maas domains read and in the MAAS WebUI, it updated it as well.

    I then clicked on my new node, and commissioned it. After 10 minutes, it was commissioned and ready for deployment. I deployed, which I have to say, is a huge improvement over 1.9. In the node tab, under Interfaces, I could statically set my IP address, which I did, and then I clicked deploy, and from the pull down said 16.04 and it was off. About 20 minutes go by, and it’s done. Now, I ssh into my new server and I can login with my SSH keys from my various workstations and it works. I then go through the process of installing LAMP on the server and getting WordPress configured and recovering my site from my backup. Then I notice that I don’t have my CNAME records to access my server via www or wordpress. I go into research mode. How do I add CNAME’s to MAAS 2.0 DNS? Great news, according to Canonical’s maas.io site, you can do this, but once again, they don’t tell you how. After spending hours doing Google-Fu and on freenode asking around, to no avail, I decided “Whats the worse that can happen?” I start poking through the MAAS source on the dnsresource flags and relize that there is an option in the MAAS CLI for dnsresource-records. I look into that and low and behold, it tells you there I can create A, AAA, CNAME, MX, SRV, NS and TXT records. So, through about 2 hours of trial and error, I finally figured it out:

    maas maas dnsresource-records create fqdn=www.lucaswilliams.net rrtype=cname rrdata=webserver

    It shown the record in the DNS tab in MAAS as well. I was able to ping the new CNAME and it responded properly. You are able to see this page as a result of it working as well.

    I did the exact same above steps for my mail server as well, however, I had to create a MX record for it since it was failing its install step doing an MX record lookup. Great, how do I do that? Luckily, after only an hour of trial and error, I figured it out:

    maas maas dnsresource-records create fqdn=lucaswilliams.net rrtype=mx rrdata='10 mail.lucaswilliams.net'

    It updated in the DNS tab in MAAS and I could see all of these with the MAAS CLI. I was also able to add static servers that were not commissioned by MAAS into DNS via the CLI with the following command:

    maas maas dnsresources create fqdn=hostname.lucaswilliams.net ip_addresses=ip.add.re.ss

    Anything that is DHCP assigned will populate DNS automagically.

    And there you have it, a way to add MX and CNAME records so that you don’t have to do the research, or if you Google search it, hopefully you fall here.

    Let me know in the comments if this helps you or not, and let me know what else you want to know about.